The Central Production Unit (CPU) acts as an internal supplier within your business. It allows you to produce, price, and distribute internal products to your operational outlets — often used in warehouse or prep kitchen setups.
This article outlines the full process to set up CPU Products, from recipe creation through to internal ordering.
🧭 Overview of the Process
-
Create a Recipe or Sub-Recipe in the CPU location
-
Generate a Menu Item (this becomes the sales entity of the CPU product)
-
Convert that Menu Item into a Product (so it can be ordered by other outlets)
Once completed, your outlets will be able to order the finished product from the CPU.
Step 1 – Create Recipes at the CPU Location
-
Log into your CPU location

Your outlet hierarchy may differ, but make sure you’re operating under the correct CPU profile.
-
Create your Recipe or Sub-Recipe as usual under:
Menu Costing > Recipes or Sub-Recipes -
Once completed, click Save and Create Menu Item

This will link your recipe to a menu item for sales and tracking.
Step 2 – Create a Menu Item for Internal Sale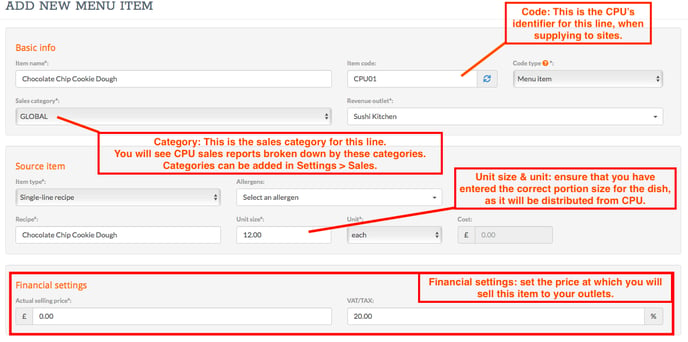
The system will open the Add New Menu Item form.
Fill this in with the following details:
-
Name: Matches the recipe or product
-
Item Code: Use a consistent naming convention if applicable
-
Sales Category: e.g. “Internal Supply”
-
Selling Price:
-
If transferring at cost, copy the cost from the source recipe into the selling price
-
If applying a markup, this should be reflected in the Financial Settings
-
-
Tax/VAT: Apply if required — otherwise, leave as zero
💡 This Menu Item will act as the CPU’s sales profile for the product, allowing outlets to “buy” it from the CPU.
Step 3 – Convert Menu Item into a Product
-
Go to:
POS > Menu Items -
Locate the Menu Item just created
-
Click Actions > Create Product

Complete the Product Form: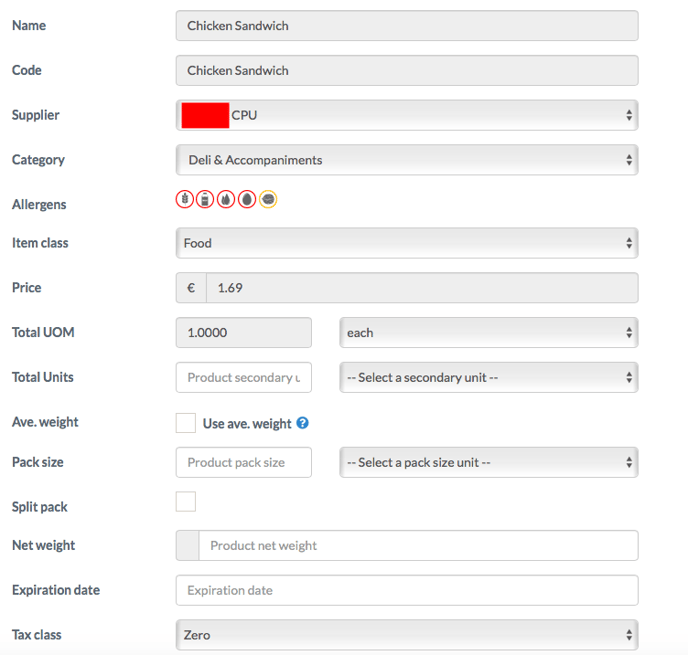
-
Supplier: Choose the CPU supplier profile
-
Class: Food, Beverage, or relevant category
-
Secondary Units: Add if applicable (e.g. for inventory tracking)
-
Click Save
✅ This step turns your CPU Menu Item into a catalogue product that can be ordered by other outlets.
You’re Done!
The CPU product is now available for ordering by connected outlets.
-
Outlets can now place Purchase Orders to the CPU
-
The CPU can manage deliveries and production records accordingly
-
This helps streamline internal stock movement and production visibility
🧠 Best Practices
-
🏷 Keep consistent naming and coding across recipes, menu items, and products
-
📊 Transfer at cost unless instructed otherwise — markups can be misleading in internal GP reporting
-
🛒 Review your CPU product list regularly to keep availability current
-
📦 Ensure units and pack sizes are accurate for both inventory and ordering
❓FAQs
What is a CPU in Kitchen CUT?
A CPU (Central Production Unit) acts as an internal supplier — often a prep kitchen or warehouse — where items are made and then transferred to operational outlets.
Why create a menu item before a product?
The menu item provides a sales and cost profile, which ensures the product you create from it reflects true internal pricing and usage data.
Can I adjust the price after creating the product?
Yes, the product pricing can be updated if needed.
🆘 Need Help?
📧 Email Support: support@kitchencut.com
📝 Submit a Ticket: Submit a ticket